Mein Panzer Cold War - A Ridge Too Far

Introduction
It's the summer of 1976. Jossa enjoyed a brief period of quiet as the war moved west. The residents who had stayed in Jossa began to pick up the pieces and wonder what the future held in store for them. They didn’t have long to wait. The Americans stopped the Soviet drive and began to push the Soviets back. The locals, now experienced in these matters, had marked the offensive’s progress as the rumble of artillery had drawn closer. When the Soviet Army soldiers began preparing positions on the east ridge above the town and in Jossa itself, they knew that the “red-hot rake of war”, to borrow Churchill’s expression, was coming back to Jossa. Time to get the basements and cellars ready.
Situation
The US V Corps is pushing the Soviets eastwards. Fresh US reserves have been introduced into the fight and these forces have helped drive the tattered Soviet forces east. In this scenario, a reduced Soviet motor rifle company will defend the eastern ridge behind the town of Jossa against a reinforced US mechanized infantry company.
The Battlefield

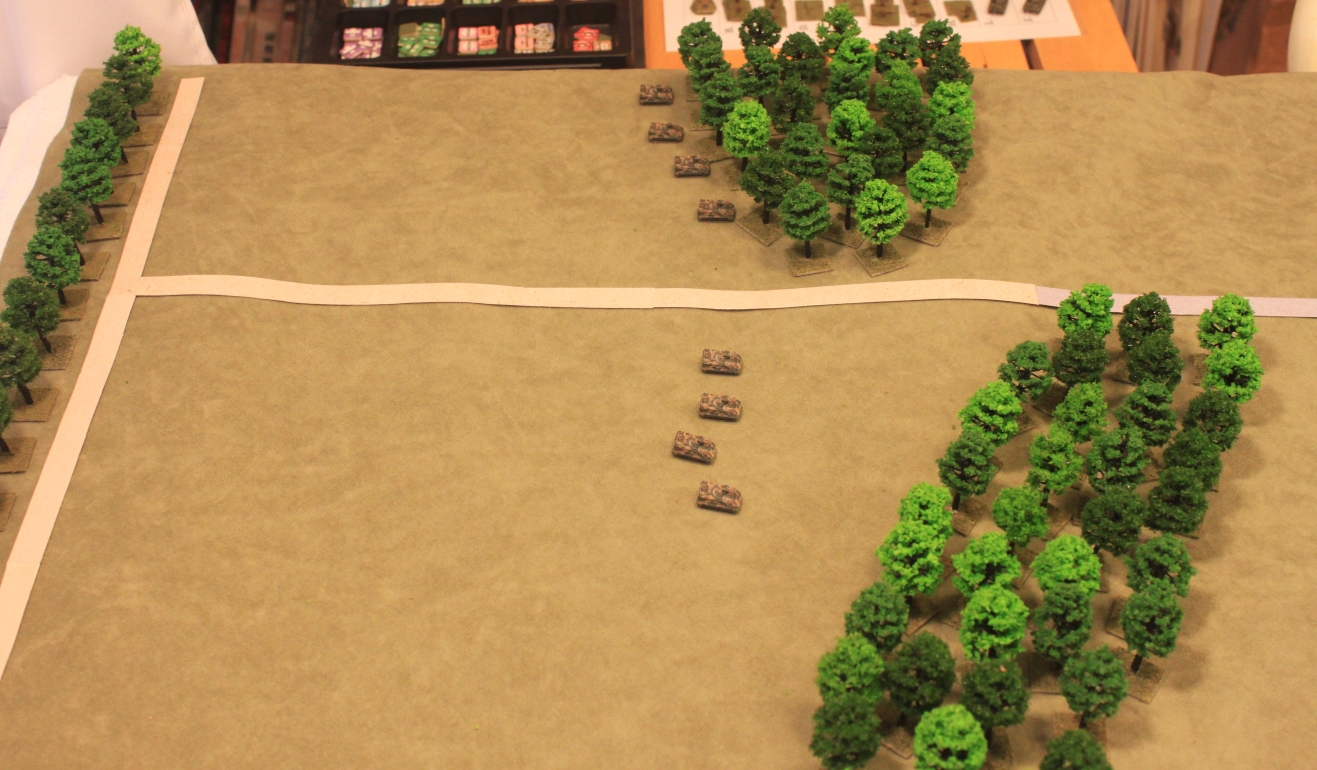
This is the field of battle. The village of Jossa sits in the center of the table in a shallow valley. The top of the picture is west, the direction from which the Americans will come. The Soviets will be positioned mainly on the east ridge, which is the bottom of the picture. The trees are impassible to tanks, but smaller vehicles like M113s, BMPs and BRDMs can work their way through. The field is 3 kilometers west to east and 1.5 kilometers north to south.
The Soviets
Mission
Defend to eastern ridge behind the village of Jossa. Do not allow the Americans to take the ridge.
Forces Available
The following forces are available to the Soviet player.
On Table:
- 1 x Motor Rifle company (reduced) – 7 x BMP-1; 6 x Motor Rifle squads; 1 x company HQ
- 4 x T-62 tanks
- 1 x Sagger BRDM-2
- 2 x Dismounted Sagger ATGM teams
Off Table:
- 1 x 120mm regimental mortar battery – 6 tubes (on call) with 6 x HE fires and 3 x smoke fires
- 1 x 122mm artillery battery – 6 tubes (on call) with 6 x HE fires and 3 x smoke fires
- Counter battery detection and counter-battery artillery assets
- Anti air defense artillery assets
Plan
The plan is to try to break up, disrupt and slow down the US attack as much as possible before their attack reaches the main defense line. The village of Jossa will be held by a platoon of infantry as a forward position and artillery fires have been plotted in front of and behind the village and in front of the main defense line.
Deployment

The Main Position in the above photo is where the motor rifle company is dug in, the three platoons in line, due to the length of front to cover. The military crest is in front of the Soviet position, out in the open. The Soviets opt to prepare their entrenchments inside the trees to gain the advantage of concealment. A lack of time to prepare means the BMP-1s are not dug in, but concealed and protected as well as possible within the trees. Lanes for fire are cleared so the position is covered, but without compromising concealment.
Positions 'A' are where the dismounted Sagger teams have deployed and dug in. These positions give them flanking shots along the front of the Soviet main defense line. Position 'B' is behind the farm buildings and is occupied by the BRDM-2 Sagger unit. The 'T' positions are where the T-62s are deployed to cover avenues where enemy tanks can penetrate the wood along the ridge line.
The center platoon’s initial position will be in the village of Jossa. It has taken up positions inside the village, away from the village's western edge. This is to minimize vulnerability to direct fires from the enemy and to keep engagement ranges short to counter US indirect fires. An observation post is placed on the western edge of Jossa. This platoon will fall back to the center of the ridge line Main Position for the main defense when directed to give up the Jossa position.

The above photo looks toward the west edge of the table and the expected approach path of the American (indicated by the blue arrow). 'F' indicates the forward Soviet position in Jossa.
The Soviet player is playing with his units hidden until spotted. He also gets dummy counters to further increase the enemy's uncertainty. The dummies are provided at the ratio of one dummy marker for every two actual markers.
The Americans
Mission
The US force, a reinforced mechanized company team, will attack to seize the eastern ridge behind the village of Jossa. This attack is in support of a larger effort to the north to take the towns of Poppenrod and Hosenfeld.
Forces Available
On Table:
- 1 x Mechanized Infantry company (15 x M113s): 3 x Mech platoons (4 x M113s per plt.); 1 x Company HQ (1 x M113); TOW section (2 x M150 TOW carriers)
- 1 x M60A1 tank platoon (5 x M60A1 tanks)
Off Table :
- Mech company mortar platoon (3 x 81mm mortars) , 6 x HE fires, 3 x smoke fires
- 1 x battery of 155mm artillery in direct support (6 guns), 6 x HE fires, 3 x smoke fires
- 1 x F-4 Phantom on-call close air support
- Counter battery detection and counter-battery artillery assets
Plan
The US goal is Objective Blue, the ridge east of Jossa.

The blue arrows indicate the line of approach selected by the US commander. The tracks (APCs) can move through the woods, so they can follow the general path indicated by the arrows. The tanks cannot move through the woods. They will enter the table along the dirt road at the bottom right in the photo above. The trees along Phase Line (PL) Red block the line of sight from the Soviet positions so the approach to PL Red is mostly concealed from the enemy’s view. Once the company team has formed up on PL Red then the move to Jossa and PL White will be made. Once Jossa is secured and the company team has moved up to PL White, the assault on Objective Blue will take place. These advances will be covered by artillery and mortar fires and smoke. Close air support will strike the objective before the final move to Objective Blue begins. The TOW section will provide anti-tank overwatch from PL Red.
The Game
The US begins by advancing two mech platoons towards PL Red, 2nd platoon in the center and 3rd platoon to the left.
These are followed on the next turn by the 1st platoon, the company HQ, and the TOW tracks. The lead platoons move through the trees to the east edge of the woods. The Soviets do nothing at this time.

The US tanks come down the forest road and begin to enter the open area behind PL Red. The US commander has the company mortars fire smoke to obscure the gap in the trees on the south of the advanced group of trees to facilitate the tanks movement across the open space behind PL Red.

As the US tank platoon completes its movement, the US calls down 155mm fire on Jossa to suppress any Soviets on the western edge of the town. Soviet counter-battery fails to locate the US 155mm battery. The US 2nd platoon advances under cover of this fire on Jossa. Unfortunately, the Soviets have called in their own preregistered 122mm artillery fires to land in front of Jossa. It is not a happy meeting with the advancing US platoon. Two tracks are killed and one track is immobilized by the Soviet barrage. Fortunately the US infantry avoid casualties as they dismount from their 113s. Happily for the grunts on the ground, but unbeknownst to them, the US counter-battery system locates the Soviet 122mm battery. US fires kill two Soviet guns. This battery is now suppressed. The Soviets, while losing the use of their artillery for a few turns (as it recovers and relocates) have reduced the US attackers' mobility.

(Note – in the above photo gray smoke is US artillery and brown is Soviet)
The American infantry moves into the town and clear their way to the highway where they encounter Soviet main line of resistance. The US commander decides that 2nd platoon will need some heavy direct fire support so he sends the tanks down to Jossa the help out. The US commander calls for smoke from the 155mm battery to cover the left flank for the advance of the tank platoon. The mission is fired but this time the Soviet counter-battery team locates and fires on the US artillery. No losses to the US guns, but they scoot to a new location.

The firefight in Jossa intensifies. The tanks add their fires and buildings begin to collapse under the blows. The Soviets get an RPG hit and immobilize one M60 tank. An RPG kills another M113. The Soviets begin to take casualties. After five turns of close combat the Soviets decide it’s time to leave. Soviet 120mm mortars are called down on Jossa to cover the Soviet infantry’s pull back to their BMPs.

Covered by the HE barrage the Soviets load up into their vehicles. When the Soviets are ready the 120mm mortars drop their fires and put down smoke, The BMPs move back through the covering screen. The US infantry, sensing the enemy has moved off, dashes across the road and takes possession of the remainder of Jossa.

The Soviets successfully withdraw to their own positions using the smoke and terrain to mask their movement. The Soviet platoon reoccupies their trenches in the main defensive position.

With the town taken the US commander calls down the two mech platoons back in the trees and gets them into position for the next move: up the slope to Objective Blue.

Now is the time to call in the air strike on the Soviet position on the ridge. The US FAC (forward air controller) is given the target. Strike along the axis of the line. The FAC marks the target with red smoke and calls in the strike.

The F4 approaches the target ejecting flares.

A dozen 500 lb bombs are released.

They impact the objective.

But Soviet anti-air defense gets its revenge as the F4 tries to exit the area.

The crew successfully bails and gets back to their unit in time for beer call.
The American bombs fall on the left of Soviet position. Two platoons receive the brunt of the bombs. The Soviets have 3 BMPs destroyed and an infantry casualty by the bombs. The remaining Soviet troops in the impact area are suppressed and pinned. Broken trees and debris litter the impact area.
The US 155s and 81s fire smoke to lay flanking screens to cover the advance of the US attack. Soviet counter-battery fails to detect any of the US fires. The US assault begins with the remaining mounted infantry platoons advancing in line, 1st platoon on the right and 3rd platoon on the left. The point of assault is the still smoking trees. The US 2nd platoon, now without transport, remains behind in Jossa.

US artillery and mortars shift fires forward and continue firing smoke (the 155s) and HE (the mortars), extending the screen. The Soviet 122mm artillery battery, now four guns, puts down defensive fires in front of the Soviet position. The US tracks continue their advance, now followed by the M60 tanks. The Sagger BRDM behind the farm spots an advancing M113, fires and misses and decides to bug out. Soviet calls for the 120mm mortars are denied. They are needed elsewhere and will no longer be available.

The tracks and tanks slow down and close up as they draw closer to the Soviet 122mm artillery barrage. Finally the US counter-battery locates these guns and takes their fires down. Another gun is lost by the Soviet battery. The US 155s now start working the tree line (gray smoke).

The US 155mm fires are lifted and the tracks advance to the tree line and dismount their infantry. Soviet small arms begin to greet the US grunts, with the 3rd US platoon (on the left) taking a casualty and becoming shaken on the morale check.

The fire fight begins to intensify as the US tries to push deeper into the trees. The American 1st platoon takes a casualty, but a Soviet squad is destroyed in return. The US infantry presses into the woods on the Soviet left as the Soviet platoon facing them breaks and falls back. The US tanks move closer to the trees.

The American 1st platoon begins to advance deeper into the Soviet position. The opportunity to roll up the Soviet defense beckons. But the fight is more difficult for the American 3rd platoon. A loss requires the US to make a morale check and Fate turns her back on the Americans. 3rd platoon breaks! And begins to fall back.

The 3rd platoon continues their run back down the hill, heedless to all efforts to rein them in. The US tanks edge closer to the woods, concerned at their exposure to flanking shots. The victorious American 1st platoon on the right presses forward, not quite aware that their comrades have left them alone in the woods. The Soviet commander begins scrambling to assemble a force to push the Americans out of his positions.

The Soviets get a clear Sagger shot at the M60 tank lurking back by the farm buildings down the slope and get a kill. The fleeing US infantry continues their downslope course. The US commander decides the platoon and tanks still on the objective are too exposed, so he orders their withdrawl. The 155mm artillery begins covering fire.

With the American 1st platoon now loaded up, the US tracks and tanks speed down the slope to Jossa with Soviet and US artillery exploding behind them. A last Sagger shot is fired at the Americans (the small puff of white smoke) as they withdraw, but misses.

The Americans get back into Jossa without further loss. They take up defensive positions. Order is restored. The US commander reports his lack of success. He is informed that the American attacks up in Poppenrod and Hosenfeld have met with marginal successes. Tomorrow will see another effort to the east.

Results
U.S. Losses: 1 tank killed; 1 tank immobilized; 3 M113s killed; 1 M113 immobilized; 1 infantry squad killed; 1 F4 shot down.
Soviet Losses: 3 BMPs killed; 2 infantry squads killed; 3 122mm artillery guns destroyed.
Assessed: Soviet win for holding the ridgeline. The US failed to take the ridge, but did gain control of Jossa.
Comments
This scenario was what the Jossa table was set up for: to consider the problems involved with attacking with a US M113 based mech infantry company in the late 1970s. The M113 was not an infantry fighting vehicle (IFV) but an armored personnel carrier (APC). The difference is the IFV, like the Soviet BMP or the German Marder, carried a heavy weapon for use in the attack or defense. The M113, as the US instructors took pains to explain to new lieutenants, was a battlefield taxi. Its purpose was to transport infantry around the battlefield, keeping up with the tanks, and providing their infantry passengers with protection from small arms fire and shrapnel. It wasn't a mini-tank. The infantry would fight on the ground once delivered to the objective.
Getting the infantry to the objective is the core problem.
Tanks may help by providing suppressive fire on the enemy defenses, but tanks are not immune from enemy defenses. They are vulnerable to enemy ATGMs.
Artillery seems to be the key element in helping the US infantry cross the contested battle field to get on the enemy's positions. It was a critical element in this game's attack. Air support is also something the US depends on as well, but from a grunt's perspective artillery is the more reliable asset. In this game we have both for the Americans.
The usual approach to using artillery is to put it on your opponent's head: to kill him or suppress him until you get to him. Nothing wrong with that. Another use for artillery is to mask or isolate. In this game you will note that the US player uses artillery, both smoke and HE, quite a lot to screen moving forces.
The defender's artillery will also have a say in how things go. Here I gave the Soviets access to both 122mm artillery and 120mm mortars. The effect of the Soviet guns on taking out a platoon's worth of vehicles in front of Jossa was rather shocking to the American. Concerned that the Russian guns might weigh too heavily in the game I quietly removed the Soviet mortars from the game to keep hope alive for the US player.
Both armies were rated as Regulars for quality and morale purposes in the game. The catastrophic American morale failure on the objective was a shock all round, made worse by the persistent refusal of the American morale recovery rolls to cooperate until the 3rd platoon got under cover of the walls of Jossa. A hard fight for Objective Blue would otherwise have played out. And with what outcome? C'est le guerre.
Thus ends the Jossa series. Hope you found it interesting.
Very interesting write up. You don't see the US on the attack much in cold war games.
ReplyDelete